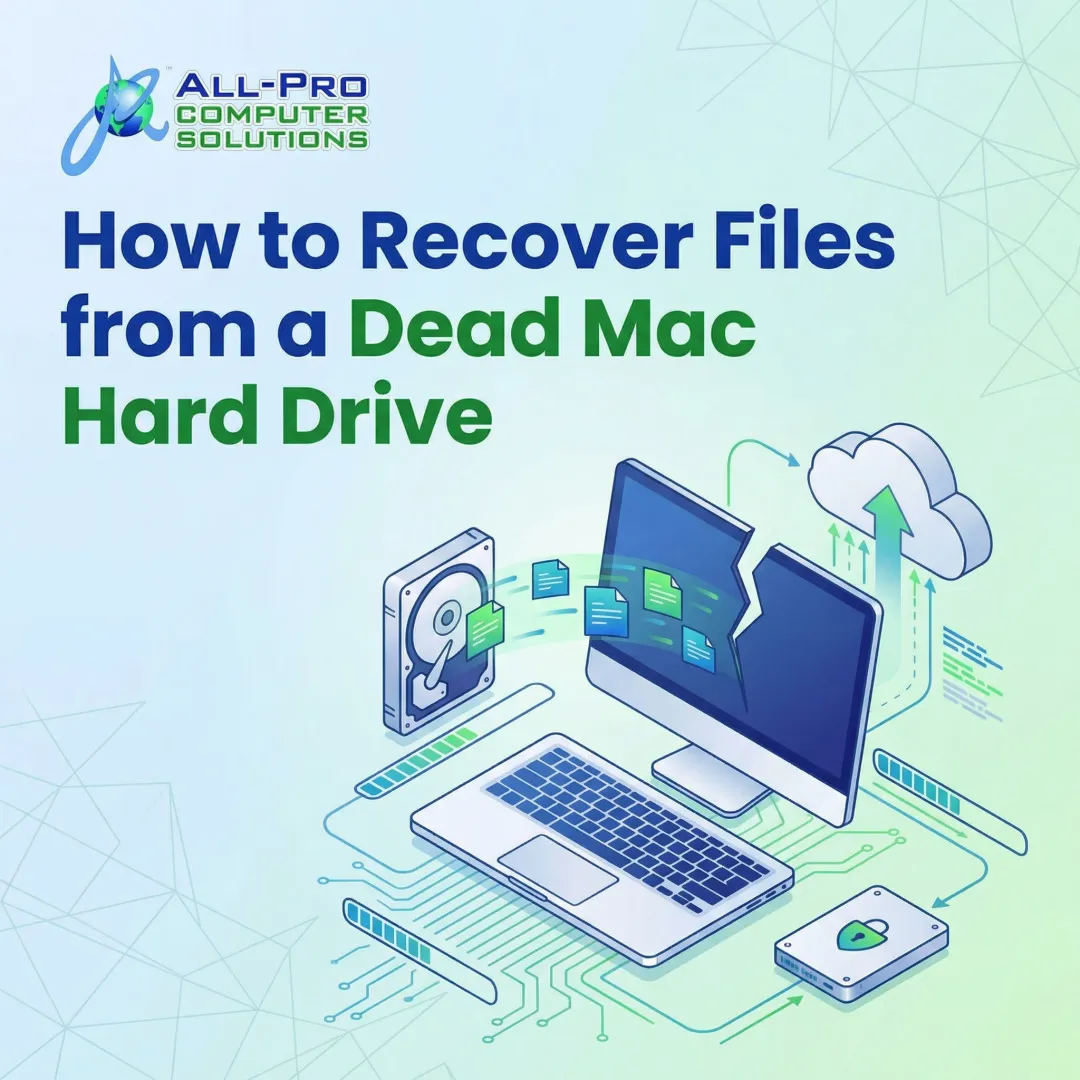
Introduction
Picture this: you press the power button on your Mac, expecting the familiar startup chime, but instead you're greeted by a grey screen, a flashing question mark folder, or worse—total silence. Your stomach drops. Photos of your kids' first day of school. Client presentations due tomorrow. Financial records for tax season. All of it suddenly feels out of reach.
Mac hard drive crashes are more common than most users expect — whether from an aging mechanical drive, a corrupted SSD, or a failed Fusion Drive. What separates a full recovery from permanent loss is usually this: every wrong move after a crash (restarting repeatedly, running disk utilities on a failing drive) can overwrite the very data you're trying to save.
This guide covers how to recognize the warning signs before disaster strikes, what to do the moment a crash happens, and when to call in a professional before you make things worse.
TL;DR
- A Mac hard drive crash can stem from physical damage, logical corruption, or firmware failure—each requires a different recovery approach
- Stop using the drive immediately after a crash to prevent overwriting recoverable data
- DIY tools (Disk Utility, Target Disk Mode, recovery software) work for logical failures
- Physical drive failures (clicking sounds, drive not detected) require professional services
- Run regular Time Machine backups and monitor S.M.A.R.T. status to catch problems early
What Happens When a Mac Hard Drive Crashes?
A Mac hard drive crash occurs when the drive fails to respond, macOS cannot read or write data, or the system won't boot. Unlike a software glitch or slow performance, a true crash makes your data inaccessible until you take corrective action.
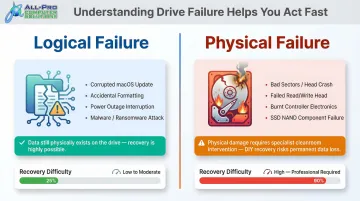
Two Main Failure Categories
Understanding which type of failure you're facing determines your recovery path:
- Logical failure: The drive hardware is intact, but the file system, directory structure, or partition map is damaged. Causes include corrupted macOS updates, accidental formatting, power outages mid-write, and malware. Logical failures represent the majority of recoverable cases because the data still exists on the drive — only the "index" telling macOS where to find it is broken.
- Physical failure: The drive hardware itself is damaged — bad sectors, a failed read/write head, burnt electronics, or failing SSD components. Backblaze's 2025 Drive Stats report puts hard drive annualized failure rates at 1.36%, while SSDs used as boot drives stay at 1% or below through their first four years. Physical recovery requires specialist intervention and cannot be achieved through software alone.
The Soldered SSD Problem
Since 2016, most MacBooks have SSDs soldered directly onto the logic board. MacBook Pro Touch Bar models (2016+), MacBook Air Retina models (2018+), and all Apple Silicon Macs (M1–M4) integrate storage with the System on Chip. A failed SSD in these machines often means replacing the entire logic board, a repair that typically runs $800–$1,500.
Apple's soldered NAND storage and Secure Enclave hardware encryption make traditional "chip-off" data recovery impossible. For modern Mac owners, a pre-crash backup isn't optional — it's the only reliable safety net.
Fusion Drive: A Third Category
Fusion Drives, offered on iMacs (Late 2012–2020) and Mac minis (Late 2012–2014), combine an HDD and SSD into a single logical volume. While this design improves performance, it multiplies failure risk — if either the HDD or SSD component fails, the entire dataset becomes unreadable. Apple's official fix for a "split" Fusion Drive involves the Terminal command diskutil resetFusion, which permanently deletes all stored data.
Warning Signs Your Mac Hard Drive Is Failing
Most hard drive crashes don't happen without warning. Recognizing these signals early gives you time to back up before a full failure occurs.
Unusual Noises (HDDs Only)
Clicking, grinding, or buzzing sounds point to a failing read/write head or spindle motor. Stop using the drive immediately and get professional help. SSDs fail silently with no audible symptoms, so monitoring tools are essential for flash-based storage.
Frequent Unexpected Freezes
- Beach ball spinning for minutes at a time
- Apps refusing to open or hanging on launch
- System-wide slowdowns not explained by CPU usage
These symptoms often mean the drive is struggling to read sectors. Run S.M.A.R.T. diagnostics in Disk Utility to check drive health before the problem gets worse.
Boot Failures
A Mac that refuses to start, shows a flashing folder with a question mark, or gets stuck on the loading bar is telling you the startup disk is corrupted or unreadable. This doesn't always mean the data is gone — prompt action often makes recovery possible.
File Access Problems
- Files becoming inaccessible or disappearing
- Save errors when writing documents
- Directory damage or failing sectors visible in Disk Utility logs
Back up everything accessible immediately and run First Aid. Don't wait to see if the problem resolves on its own.
Backblaze's research on S.M.A.R.T. data found that 76.7% of failed drives showed one or more warning signs before failing. The remaining 23.3% failed with zero S.M.A.R.T. warning — which is why regular backups matter even when a drive looks perfectly healthy.
How to Recover Data from a Crashed Mac Hard Drive
Before anything else, stop writing new data to the affected drive. Every file saved, app opened, or macOS restart increases the risk of overwriting recoverable files. On modern NVMe Mac SSDs, deleting an APFS volume triggers TRIM commands that permanently erase NAND blocks within seconds or minutes. Connect an external drive before beginning any recovery attempt.
Step 1: Run First Aid in Disk Utility (or Recovery Mode)
This is the first and safest DIY step for logical failures where the Mac can still partially boot or access Recovery Mode.
Instructions:
- Boot into Recovery Mode:
- Intel Macs: Hold Command+R immediately after pressing power
- M-series Macs: Hold power button until startup options appear, select Options → Continue
- Open Disk Utility from macOS Utilities
- Select the affected drive from the sidebar
- Click First Aid
- Allow the tool to check and repair volume, directory structure, and file system errors
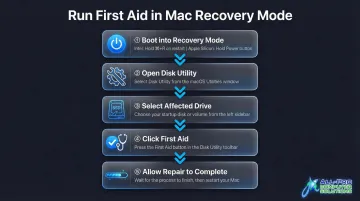
Key limitations: Disk Utility cannot repair a corrupted partition map without erasing the drive. It cannot help with physical failures. If the drive does not appear in Disk Utility's sidebar at all, move to Step 3 or seek professional help.
Step 2: Use Target Disk Mode to Access the Failing Drive
Target Disk Mode turns one Mac into an external drive accessible from another working Mac via USB-C or Thunderbolt cable—useful when macOS won't boot but the drive is still partially readable.
Instructions:
- Shut down the crashed Mac
- Connect it to a working Mac using the appropriate cable (Thunderbolt, USB-C, or FireWire for older models)
- Power on the crashed Mac while holding the T key
- If the drive mounts on the working Mac, immediately copy priority files to a separate external drive
Important notes:
- This method works with Intel Macs using Thunderbolt/FireWire or USB-C
- Apple Silicon Macs use a different "Share Disk" utility in Recovery Mode instead
- If the drive doesn't appear, it likely has physical damage
Step 3: Use Third-Party Data Recovery Software
If Target Disk Mode failed due to physical damage, professional recovery is likely your only option. For logical failures where Disk Utility couldn't repair the drive but the drive is still detectable, recovery software can scan for file patterns even when the directory is damaged.
General process:
- Boot from an external drive or second Mac (using Target Disk Mode)
- Install recovery software on the working system (never on the failing drive)
- Scan the failing drive
- Preview recoverable files
- Save recovered files to a separate external drive—never back to the failing drive
Note: Scanning a damaged drive takes time (hours to days for large drives) and should only be done once to minimize further wear on the drive.
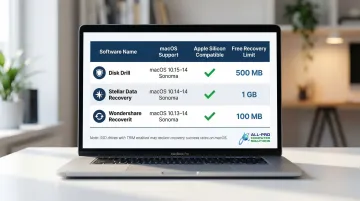
Reputable Mac data recovery software options:
| Software | macOS Support | Apple Silicon | Free Preview |
|---|---|---|---|
| Disk Drill | 10.15.7–macOS Tahoe | Native M1–M5 | Unlimited scanning/preview; paid recovery |
| Stellar Data Recovery | 10.13–macOS Tahoe | Native M1–M4 | Up to 1GB free recovery |
| Wondershare Recoverit | 10.10–macOS Tahoe | Native M1–M4 | Up to 100MB free recovery |
Independent reviews from PCMag, Macworld, and TechRadar note that while these tools excel at logical recoveries on HDDs, they're significantly limited on SSDs — TRIM technology permanently erases deleted data, often before any scan can reach it. If your data is on an SSD and these tools come up empty, professional recovery services are the next step.
DIY Recovery vs. Professional Data Recovery: When to Call an Expert
Attempting DIY recovery on a physically damaged drive can worsen the damage and permanently destroy data. Knowing the boundary between DIY and professional intervention is critical.
Try DIY If:
- The Mac still boots or partially responds
- Drive is visible in Disk Utility (even greyed out)
- Failure appears software/logical (no unusual noises, no impact damage, no burn smell)
- A recent Time Machine or cloud backup exists
In these cases, Disk Utility First Aid, Recovery Mode, or data recovery software may be sufficient.
Call a Professional Immediately If:
- The drive makes clicking, grinding, or buzzing noises
- The drive is completely undetected by Disk Utility and Target Disk Mode
- The Mac was dropped, exposed to water, or had a power surge
- Recovery software fails to detect or scan the drive
- The data is business-critical or irreplaceable (client files, financial records, medical data)
Physical recovery means working in ISO-5 Class 100 cleanrooms to repair or bypass failed hardware components, extract raw drive data, and reconstruct files. Opening an HDD outside a cleanroom guarantees fatal contamination — even a single dust particle can destroy a platter.
The less a failing drive has been tampered with before reaching a technician, the better the odds of full recovery. Every unnecessary restart attempt or DIY scan risks overwriting recoverable data.
APCS: Local Mac Data Recovery for the North Bay Area
For North Bay Area Mac users, APCS provides emergency technical support and data recovery services, including same-day diagnostics. Technician Richard has over 25 years of IT experience serving homes and small businesses across Sonoma, Marin, and Mendocino counties — and takes on after-hours emergency cases when data can't wait. Calling before you attempt repeated restarts gives him the best shot at getting everything back.
Contact APCS:
- Sonoma County: (707) 400-7100
- Marin County: (415) 900-8928
- Email: apcs.rd@gmail.com
How to Prevent Future Mac Hard Drive Crashes
Most data loss events are preventable. A few consistent habits are all it takes to avoid turning a minor setback into a permanent loss.
Set Up Time Machine and Follow the 3-2-1 Backup Rule
Apple recommends using a Time Machine backup disk with at least twice the storage capacity of your Mac. The industry-standard 3-2-1 backup rule, endorsed by CISA, calls for:
- 3 copies of important files
- 2 different media types (e.g., external drive + cloud storage)
- 1 copy stored offsite (iCloud, Backblaze, or other cloud backup)
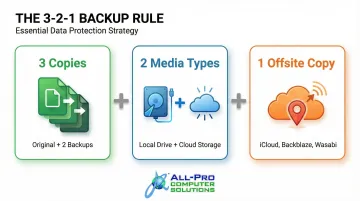
One critical distinction: cloud sync is not the same as a backup. Backblaze's 2024 State of the Backup survey found that while 84% of users claim to back up data, only 42% of organizations successfully restored all data after a loss. Verify your backups monthly to confirm they're current and restorable.
Monitor Drive Health Proactively
Built-in tools give you a solid starting point. Check Disk Utility's S.M.A.R.T. status quarterly, run First Aid as a preventive check, and watch for status changes from "Verified" to "SMART Status: Failing."
For more proactive coverage, third-party tools add automatic alerts:
- DriveDx: Macworld Editors' Choice utility that monitors S.M.A.R.T. status, flags early warnings, and tracks free disk space
- SMARTReporter: Free tool that polls S.M.A.R.T. status and sends on-screen and email notifications before failures occur
Practice Safe Mac Habits
- Avoid force-shutting down during updates or file transfers
- Keep at least 10–15% of drive space free to avoid file system strain
- Install macOS updates completely and avoid interrupting them
- Never perform major OS upgrades without a current backup
If keeping up with all of this feels like a second job, APCS handles it for you. North Bay homes and businesses on APCS's managed IT plan get proactive drive monitoring, scheduled maintenance, and a personalized data protection setup — including an IT binder with all critical system information on hand when you need it.
Frequently Asked Questions
Is it possible to recover data from a failed hard drive?
Yes, recovery is often possible for logical failures using software or professional services. Physical damage significantly reduces success rates. The key is to stop using the drive immediately and seek help quickly before data is overwritten.
What are the signs of a dying HDD?
Key warning signs include clicking or grinding noises, frequent system freezes, slow file access, unexpected crashes or error messages, and the Mac failing to boot. SSDs fail silently, so run regular S.M.A.R.T. checks even when you hear nothing unusual.
Can you fix corrupted files on a Mac?
Minor file system corruption can often be repaired using Disk Utility's First Aid tool or the fsck command in Terminal/Recovery Mode. Severely corrupted files may require data recovery software or professional services, and some files may be unrecoverable if overwritten.
What should I do immediately after my Mac hard drive crashes?
Stop using the drive right away to prevent overwriting recoverable data. Do not restart the Mac repeatedly. Connect an external drive and avoid saving anything new to the system.
How long does Mac hard drive data recovery take?
DIY software recovery takes anywhere from a few hours to several days, depending on drive size and damage level. Professional timelines differ by failure type—logical recoveries typically wrap up in 1–3 days, while physical repairs requiring cleanroom work take longer.
What is the difference between a logical and physical hard drive failure?
Logical failure means the drive hardware works but the file system or data structure is damaged (recoverable with software). Physical failure means the drive's mechanical or electronic components are damaged (requires professional hardware-level repair and cannot be fixed with software).