](https://file-host.link/website/allprocs-rvuh1n/assets/blog-images/2488e4a4-d9c3-469d-a384-8547680901f5/1776113795351860_a6645f3663b2435b84fa5581dc03c87e/360.webp)
Recovering files from a dead Mac hard drive is possible in many situations, though the right approach depends on your Mac model, storage type, and what caused the failure. This guide covers the most common causes of a dead Mac drive, five practical recovery methods ranked from easiest to most advanced, clear guidance on when to attempt DIY versus calling a professional, and actionable steps to protect your data going forward.
TLDR
- A "dead" Mac usually means the drive has failed or the system can't boot — not that your files are permanently lost
- Recovery options range from backups and macOS Recovery Mode to Target Disk Mode and data recovery software
- Newer Macs (2018+) with T2 chips or Apple Silicon typically require professional recovery due to encrypted, soldered SSDs
- Stop using the Mac immediately if you hear clicking, grinding, or beeping sounds
- Acting quickly and choosing the right method gives your files the best chance of recovery
Why Is Your Mac Hard Drive "Dead"? Common Causes
A "dead" Mac hard drive means your Mac fails to boot, won't power on, or the drive is no longer recognized by the system. The cause matters — it determines which recovery method has a real chance of working.
Physical and Mechanical Failures
Hard knocks, drops, liquid spills, and overheating can destroy the read/write heads or logic board inside your Mac. If your Mac makes clicking, grinding, or beeping sounds, that's a red flag indicating mechanical failure. Power it off immediately — continued use can cause the read/write heads to physically scrape the magnetic platters, permanently destroying your data.
Software and Logical Failures
Software failures cover a range of common culprits:
- Corrupted operating system files
- Bad sectors on the drive
- Power interruptions during a write operation
- A failed macOS update
Unlike physical damage, software failures are often more recoverable — the underlying data typically remains intact on the drive itself.
Age and Wear
Both HDDs and SSDs degrade over time. Backblaze's 2025 Drive Stats report found an annualized hard drive failure rate of 1.36% across 349,462 monitored drives. SSDs have finite write endurance measured in Terabytes Written (TBW) — for example, the Samsung 980 PRO 1TB is rated for 600TBW over five years. A Mac over 5-7 years old carries a higher risk of storage failure due to normal wear — if yours is in that range and showing symptoms, the sections below walk through your recovery options.
Stop! Do This Before You Try Anything Else
The worst thing you can do after a drive failure is keep using your Mac. Every write operation — including the OS trying to boot — risks overwriting recoverable data. Power it off immediately.
Know your Mac's storage type before choosing a recovery method:
- Older Macs (pre-2016): Often have removable HDDs or SSDs that are easier to recover
- Newer Macs (2018 and later): Have SSDs soldered directly to the logic board and encrypted by the T2 chip or Apple Silicon
That distinction matters when it comes to your recovery options. Macs with T2 or Apple Silicon use hardware-level encryption tied to the Secure Enclave. If you physically remove the storage chips, the encryption keys stay locked to the original logic board — leaving your files permanently inaccessible. For these models, professional recovery is essentially the only viable path.
How to Recover Files from a Dead Mac Hard Drive
These five methods are ordered from least invasive to most complex. Start with the simplest option and only move to the next if the previous doesn't work.
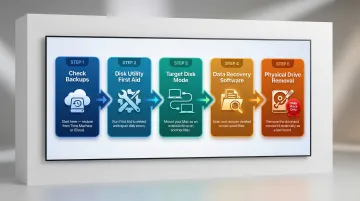
Method 1: Check Your Backups First
If you've been using Time Machine backups on an external drive or syncing files to iCloud Drive, recovering is straightforward — even on a completely dead Mac.
To access Time Machine from another Mac:
- Connect your Time Machine backup drive to a working Mac
- Open Migration Assistant (Applications > Utilities)
- Select "From a Mac, Time Machine backup, or startup disk"
- Choose your Time Machine backup and select the files or system you want to restore
To restore from iCloud:
- Sign in to iCloud.com from any device
- Navigate to iCloud Drive
- Download the files you need
If you have backups, you're done. If not, continue to Method 2.
Method 2: Run Disk Utility First Aid from macOS Recovery Mode
macOS Recovery Mode lets you run Disk Utility's First Aid tool without booting from the damaged drive. This can repair minor corruption and restore bootability.
How to enter macOS Recovery:
- Apple Silicon Macs: Press and hold the power button until "Loading startup options" appears, then click Options and Continue
- Intel Macs: Press and release the power button, then immediately press and hold Command (⌘) + R until the Apple logo appears
Once in Recovery Mode:
- Select Disk Utility from the macOS Utilities window
- Choose your internal drive from the sidebar
- Click First Aid and then Run
- Wait for the scan to complete
Apple's documentation notes that First Aid can fix formatting and directory structure errors, but it cannot repair all problems. If Disk Utility tells you the disk is about to fail, back up your data immediately and replace the drive.
Method 3: Use Target Disk Mode or an External Boot Drive
Target Disk Mode connects your dead Mac to a working Mac via Thunderbolt or USB-C cable, turning the dead Mac's drive into an external drive you can browse and copy files from.
How to use Target Disk Mode:
- Intel Macs: Hold the T key during startup. Connect the two Macs with a USB-C or Thunderbolt cable
- Apple Silicon Macs: Boot into macOS Recovery, select Utilities > Share Disk, then connect via cable
Important caveat: If either Mac runs macOS 11 (Big Sur) or later, a Thunderbolt cable is strictly required.
External bootable USB drive alternative: If your Mac can't enter Recovery Mode or Target Disk Mode, you can create a bootable macOS installer on a USB drive from another Mac, then boot your dead Mac from that external drive to access files.
Method 4: Use Data Recovery Software
If the drive is still detectable but files are missing or the system won't boot, third-party data recovery software can scan the drive sector-by-sector and retrieve files even when the directory is damaged.
Tested Mac data recovery tools include:
- Disk Drill: $89 PRO license; well-regarded for deep scan and filtering, though less effective on SSDs with TRIM enabled
- Stellar Data Recovery: $69.99–$99.99/year; recovers most file types with free scan and up to 1GB free recovery
- Wondershare Recoverit: $79.99/year to $139.99 perpetual; clean interface with video repair features
Critical rules:
- Always save recovered files to a separate, healthy drive — never back to the failing one
- Most reputable tools offer a free scan before charging
- Stop the scan immediately if you hear unusual drive noises
Method 5: Remove the Drive and Connect It to Another Mac (Older Macs Only)
On older Macs with removable storage (pre-2016 MacBooks and most iMacs up to 2019), you can physically remove the hard drive or SSD and place it into a USB enclosure or adapter, then connect it to a working Mac to access files directly.
This method does NOT apply to:
- 2016+ MacBooks with soldered storage
- 2020+ iMacs with soldered flash storage
- 2018+ Mac minis with soldered storage
- Any Mac with a T2 chip or Apple Silicon
If you're comfortable with hardware and have an older Mac, follow the manufacturer's disassembly instructions carefully (iFixit offers detailed step-by-step teardown guides). If uncomfortable, skip to professional help.
DIY Recovery vs. Calling a Professional: How to Decide
DIY recovery is possible for many common failure scenarios, but making the wrong move — especially on newer Macs — can permanently destroy your data. The stakes increase with drive complexity.
DIY Is Reasonable When:
- The Mac has a removable drive (pre-2016 model)
- The failure appears to be software-related (bad update, corrupted OS)
- The drive is still detected by another Mac or by Disk Utility
- You're comfortable following step-by-step technical instructions
Professional Recovery Is Strongly Recommended When:
- The drive is making clicking, grinding, or beeping sounds (physical failure)
- The Mac has a T2 chip or Apple Silicon with a soldered, encrypted SSD
- The Mac sustained water or impact damage
- DIY methods have already been attempted without success (each failed attempt can reduce recoverability)
Common Mistakes to Avoid:
- Continuing to use a failing Mac hoping it will fix itself
- Saving recovered files back to the damaged drive
- Running multiple data recovery tools back-to-back without expert guidance
- Assuming an Apple Store is the only option for data recovery
For North Bay Area residents in Healdsburg, San Rafael, and surrounding Marin and Sonoma counties, APCS offers data recovery services with fast turnaround. Technician Richard specializes in recovering data from failing drives — both Mac and PC — and APCS takes sole responsibility for your case rather than passing it to a third party. Reach them at (707) 400-7100 (Sonoma County) or (415) 900-8928 (Marin County).
Before committing, it helps to understand what professional recovery costs. Fees typically range from $100 to $300 per hour, depending on whether the failure is logical or physical (software vs. hardware). Many providers offer a "No Data, No Charge" guarantee, meaning you pay nothing if the target files cannot be recovered.
How to Prevent Future Data Loss
A dead hard drive is painful once. With the right backup system in place, it never has to happen again.
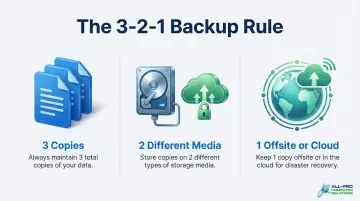
The 3-2-1 Backup Rule
This is the industry standard for data protection: keep 3 copies of important data, on 2 different media types, with 1 copy stored offsite or in the cloud. This rule was recommended by the U.S. Computer Emergency Readiness Team and is endorsed by major backup providers.
Two Essential Backup Tools Every Mac User Should Use:
1. Time Machine
- Built-in to macOS, automatic, and backs up to an external drive
- Requires an external drive with at least twice your Mac's storage capacity
- Preferred format: APFS or APFS Encrypted
2. iCloud Drive or another cloud storage service
- Protects against physical disasters (fire, flood, theft)
- Provides access from any device
- Automatically syncs files across devices
Time Machine covers local recovery; cloud storage covers everything else.
Managed Backup for Small Businesses
For small business owners and home office users in the North Bay Area, APCS offers managed IT services and data protection planning — including secure backup setup and monitoring — so that a single drive failure never means a business crisis. Contact them at (707) 400-7100 or (415) 900-8928 for a free consultation.
Despite the risks, only 11% of computer owners back up their data daily. Setting up Time Machine takes under ten minutes — there's no good reason to wait until after a failure.
Frequently Asked Questions
Frequently Asked Questions
How can I recover data from a dead Mac hard drive or a Mac that won't turn on?
Recovery is possible through macOS Recovery Mode, Target Disk Mode, or data recovery software for most software and logical failures. That said, Macs with T2 chips or Apple Silicon and soldered SSDs almost always need professional intervention — hardware-level encryption ties data to the original logic board.
How much does dead Mac hard drive recovery cost?
DIY software tools typically cost $70–$150, while professional data recovery services range from $100 to $300 per hour. Physical failures requiring cleanroom repair cost more than logical failures. Many reputable providers work on a "No Data, No Charge" basis.
Does Mac have built-in data recovery options?
Yes. macOS includes Disk Utility's First Aid tool (accessible via Recovery Mode), which can repair many software-related drive errors, and Time Machine as Apple's built-in backup solution. Neither tool can recover data from a physically failed or encrypted soldered SSD — those situations require professional help.
Can data be recovered from a Mac with a T2 chip or Apple Silicon?
T2 and Apple Silicon Macs encrypt data at the hardware level, making DIY recovery nearly impossible on your own. Professional chip-level specialists may recover data if the logic board can be repaired, though success depends heavily on the nature of the failure.
Is it safe to try DIY data recovery before taking my Mac to a professional?
Software-based DIY recovery (running Disk Utility or recovery software on a still-detectable drive) is generally safe to try first. Keep in mind that physically opening the Mac, repeatedly running failed recovery attempts, or continuing to use a clicking drive can reduce the chances of professional recovery succeeding.
How long does Mac hard drive data recovery take?
Software scans on a healthy but corrupted drive typically take a few hours. Professional recovery from physically damaged or encrypted drives may take several days, depending on damage severity and drive capacity.