MacBook SSD recovery is harder than recovery from older hard drives, but the outcome depends heavily on how quickly you act and which recovery method you use. The good news? Understanding the unique challenges of SSD recovery and taking the right steps immediately can often salvage what seems lost.
This guide covers why SSDs make recovery tricky, what to check first, the step-by-step recovery process, critical mistakes that permanently destroy your chances, and when it's time to stop DIYing and call a professional.
TL;DR
- Speed matters — stop using the drive immediately, as continued use directly lowers your recovery odds
- MacBooks from 2018 onward (T2, M1, M2 chips) use hardware encryption that makes DIY recovery extremely difficult
- Check Trash, iCloud Recently Deleted, and Time Machine before downloading third-party tools
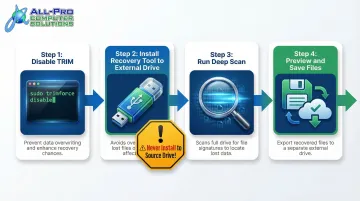
- Disable TRIM via Terminal before running recovery software on older Mac models
- If your MacBook won't power on or has physical damage, professional data recovery is the right first call
Why MacBook SSD Data Recovery Is More Challenging Than You Think
Traditional hard drives and SSDs handle deleted files fundamentally differently. On an HDD, deleted data remains on the disk magnetically until new data overwrites it—sometimes months or years later. On an SSD, the TRIM command immediately marks those data blocks as free and actively wipes them in preparation for new writes. Once TRIM clears the blocks, that data is gone permanently, even for professional recovery software.
What TRIM means for your recovery:
Apple enables TRIM by default on all Mac SSDs to keep performance fast and extend drive lifespan. The tradeoff: it's the enemy of data recovery. Recovery depends entirely on timing — specifically, the narrow window between deletion and TRIM execution. On modern macOS APFS volumes, that window is near-zero.
MacBook Model Architecture: What's Even Recoverable?
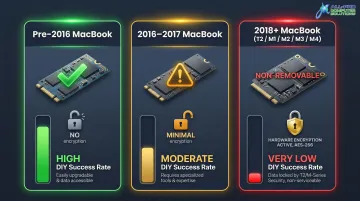
The MacBook model you own determines whether DIY recovery is viable:
- Pre-2016 models: Removable SSDs with standard PCIe connectors that can be physically moved to another machine—highest DIY success rate
- 2016–2017 without Touch Bar: Removable SSDs with proprietary connectors—still DIY-friendly with the right adapters
- 2018 onward (T2, M1, M2, M3, M4 chips): SSDs soldered directly to the logic board AND protected by hardware encryption—even if chips are physically accessed, the data is encrypted and unreadable without the original Secure Enclave chip
Logical vs. Physical Failure: What You're Up Against
Logical failure means the hardware still works — the problem is at the software or file system level:
- Accidental deletion or formatting
- File system corruption
- Software errors or malware
- Catalog structure damage
These failures may still allow software-based recovery if you act quickly, before TRIM wipes the blocks.
Physical failure means something has broken at the hardware level, which changes your recovery options entirely:
- Dead MacBook that won't power on
- Water damage or liquid spills
- Fried logic board or power management chips
- Degraded NAND cells
Physical failures often require chip-level repair before any data can be read. On T2/M1/M2 Macs, that repair must restore the original security chip to decrypt the data—attempting DIY recovery only makes professional recovery harder.
APFS and Why It Matters for Recovery
Understanding your failure type matters because APFS — Apple's file system since 2017 — behaves differently depending on what went wrong. All modern Mac SSDs run APFS, which uses a copy-on-write design and supports local snapshots. These are read-only copies of your file system captured at specific moments. Most users don't know they exist, but snapshots can restore lost data before you spend anything on third-party tools.
How to Recover Data from Your MacBook SSD
Walk through these steps in order. Skip ahead only if a step clearly doesn't apply to your situation, but don't skip Step 1 if your Mac is still accessible.
Step 1: Check the Obvious First (Before Touching Anything Else)
Run through these three checks before doing anything else:
- Open the Trash — Files stay here until you manually empty it. If the MacBook is still accessible, this takes 10 seconds.
- Check iCloud Recently Deleted — Log in to iCloud.com and look for the "Recently Deleted" folder. Files are held there for 30 days before permanent deletion.
- Restore from Time Machine — Connect your external backup drive, open Time Machine, and navigate to a date before the deletion. No software required, and the success rate is higher than any other method.
If none of these apply, move to Step 2 before opening any recovery tools.
Step 2: Disable TRIM to Protect Remaining Recoverable Data
This step only applies if the MacBook is still bootable and the deletion was recent.
Terminal command:
sudo trimforce disableWhat happens next:
- The system warns about performance impacts
- Type
Yto confirm - The Mac reboots with TRIM suspended
Important: Disabling TRIM doesn't recover files—it just stops further wiping of blocks that might still contain recoverable data. Re-enable TRIM (sudo trimforce enable) after recovery is complete.
Once the Mac reboots with TRIM suspended, proceed directly to Step 3 while the drive is idle.
Step 3: Use Data Recovery Software
After TRIM is disabled, install a data recovery application to an external drive or a different partition—never install software to the drive being recovered.
Reputable Mac SSD recovery tools include:
- Disk Drill for Mac (native Apple Silicon support, APFS-ready with encryption detection)
- Stellar Data Recovery for Mac (Universal Binaries for M1-M4, deep scan capabilities)
- R-Studio for Mac (forensic-level scanning, advanced APFS container extraction)
What to expect from a scan:
Most tools offer two modes. A quick scan reads file directory entries to find recently deleted files — fast, but limited to files deleted within the last few days. A deep scan searches the entire drive for file signatures and reconstructs scattered fragments, which takes longer but recovers far more.
Always preview files before recovering them to confirm they're intact. Save everything to a separate drive (external USB, another Mac, or cloud storage) — writing recovered files back to the same SSD can overwrite data you haven't retrieved yet.
Step 4: Use APFS Snapshots via Disk Utility
APFS-formatted Macs (macOS High Sierra and later) automatically create local snapshots that serve as restore points. APFS stores these snapshots directly on the drive, so no external backup is needed to access them.
How to access snapshots:
- Open Disk Utility
- Select the main APFS volume
- Choose View > Show APFS Snapshots
- Browse available restore points by date
Terminal command to list snapshots:
tmutil listlocalsnapshots /These snapshots are separate from Time Machine backups and can rescue files even when you don't have an external drive connected.
Factors That Affect Your Recovery Success
Time Elapsed Since Deletion
The shorter the window between deletion and recovery attempt, the better. Every minute the Mac remains in active use after data loss increases the risk that new writes will overwrite the deleted blocks.
Simple rule: Stop using the Mac immediately after realizing data is lost.
MacBook Model and SSD Architecture
Recovery difficulty varies dramatically by MacBook generation:
| MacBook Generation | SSD Type | Encryption | DIY Success Rate |
|---|---|---|---|
| Pre-2016 | Removable PCIe | None | High |
| 2016–2017 (non-Touch Bar) | Removable proprietary | None | High |
| 2016–2017 (Touch Bar) | Soldered NAND | None | Low |
| 2018+ (T2/M1/M2/M3/M4) | Soldered + encrypted | Hardware AES-256 | Very low |
Type of Failure: Logical vs. Physical
Logical failures respond well to software recovery:
- Accidental deletion
- File system corruption
- Formatting errors
Physical failures require hardware-level repair before any software recovery is possible:
- No power
- Water damage
- Logic board failure
Attempting software recovery on a physically failing drive can accelerate data loss. If the Mac won't power on at all, skip DIY tools and go straight to professional help.
Common Mistakes That Permanently Destroy Your Chances
Continuing to Use the MacBook After Data Loss
Every app launch, file save, or system update writes new data to the SSD, potentially overwriting the exact blocks where deleted files still exist. This is the single most destructive thing you can do after realizing something is missing.
Shut down immediately. Don't browse the web, don't check email, don't install recovery software on the same drive.
Attempting DIY Disassembly on Encrypted Modern MacBooks
On models with T2, M1, or M2 chips, attempting to physically remove or transplant SSD chips without proper equipment doesn't just fail—it can cause irreversible damage to the NAND chips, making even professional recovery impossible.
Here's why chip removal fails on encrypted Macs:
- All data is encrypted using AES-256 by the Secure Enclave
- The encryption keys never leave the chip
- Desoldering the NAND and reading it externally produces only useless ciphertext
- Without the original logic board and security chip, the data is mathematically unreadable

Installing Recovery Software to the Drive Being Recovered
Downloading and installing a recovery app directly onto the Mac's internal SSD writes new data to the drive, which can overwrite recoverable files before they're ever found.
Use a USB drive or external storage for software installation — never the internal drive you're trying to recover.
When DIY Recovery Falls Short: Getting Professional Help
Professional data recovery is the right first call—not a last resort—in these specific situations:
- MacBook won't power on at all
- Visible physical damage (liquid, impact, burn marks)
- T2/M1/M2 encrypted model with logic board failure
- Multiple failed DIY attempts
- Data is business-critical and irreplaceable
In these cases, every DIY attempt made first can degrade the odds of professional recovery succeeding.
What Professional MacBook Data Recovery Involves
Professional services typically include:
- Evaluation of the drive and failure type
- Chip-level logic board repair when needed to restore the encryption circuit
- Data extraction using specialized tools and clean room environments
- Delivery of recovered data on an encrypted external drive
Reputable services offer a "no recovery, no fee" policy, meaning you only pay if the data is successfully retrieved. If you're in the North Bay Area, APCS provides that same guarantee with the added advantage of in-person service.
APCS: Trusted Local Data Recovery for North Bay Area Residents
Unlike mail-in services that require shipping a damaged device, **APCS provides in-person data recovery services** in San Rafael and Healdsburg, with over 25 years of experience handling both home users and small business data emergencies.
Why choose APCS for MacBook data recovery:
- Drop off directly at San Rafael or Healdsburg — no shipping, no waiting
- Your data stays private; nothing from your device is shared with third parties
- Emergency and after-hours appointments available for urgent situations
- Richard, APCS's lead technician, has recovered data from drives other providers couldn't
Contact APCS:
- Sonoma County: (707) 400-7100
- Marin County: (415) 900-8928
- Email: apcs.rd@gmail.com
The sooner you bring the device in — before any further DIY attempts — the better the chances of a full recovery.
Conclusion
The right recovery path depends on your situation:
- MacBook still boots, deletion was recent: Act immediately — disable TRIM, check Time Machine, then run recovery software
- MacBook physically dead or won't power on: Skip DIY entirely and go straight to a professional
- T2, M1, or M2 encrypted storage: DIY tools can't bypass the Secure Enclave; professional recovery is your only option
The most common mistake is waiting too long or continuing to use the Mac after data loss — both actions overwrite the sectors you need recovered. Professional recovery services like APCS can retrieve data that DIY tools can't reach, but only if the drive hasn't been written over. The sooner you stop using the device, the better your odds.
Frequently Asked Questions
Can data be recovered from a failed or dead SSD?
Recovery from a dead SSD is possible but depends on whether the failure is logical (corruption, deletion) or physical (hardware damage). Logical failures may respond to software recovery, while physical failures on encrypted models often require professional chip-level repair.
Can I recover files from a dead MacBook Pro?
If the SSD is removable (pre-2016 models), it can be transplanted to a working Mac. On newer models with soldered, encrypted SSDs, the logic board must be partially repaired first, and professional services are typically required.
How much does it cost to recover data from a dead SSD?
Costs vary widely based on failure type and model. Logical recovery typically ranges from $100–$250, while physical/board-level recovery at independent labs costs $325–$600. Reputable labs typically work on a no-recovery, no-fee basis.
Can a corrupted or damaged hard drive be fixed or recovered on a Mac?
macOS Disk Utility's First Aid function can repair logical file system errors on a corrupted drive. Physical damage, however, requires professional intervention; First Aid cannot address hardware failures.
Does disabling TRIM improve my chances of SSD data recovery?
Disabling TRIM pauses further wiping of deleted data blocks, giving recovery software a better chance to find files. It only helps if done quickly after data loss, before TRIM has already run.
How do I know if my MacBook SSD failure is logical or physical?
If the Mac still powers on but files are missing or corrupted, it's likely logical. If the Mac won't turn on, makes no sound, or has visible damage, suspect physical failure. Disk Utility's First Aid can help diagnose logical issues on a bootable Mac.